教程所需
- 有HTML基础
- 一张自己喜欢的图片
CSS3 简介
CSS 原名层叠样式表,在前端开发充当画笔的角色,通过它我们可以自由更改HTML样式,创造出优美的前端页面。
CSS 学习建议
CSS 内容较多,本次教学并不能将往CSS 全部内容,我将采用由常用到不常用,由简单到困难的顺序为大家开展教学,并带着大家一步一步写一个简单的登入页面,希望观看本教程的同学可以跟着一起写一下,共同完成。
同时希望大家平时写代码的时候遇见忘记的CSS 属性先自行查看 MON 文档(如果是CSDN上的文档注意创作时间,避免教程版本过旧问题),如果看不懂可以上B 站上搜索相应的CSS 属性介绍(B站视频大都讲的详细易懂,但是通过视频学习会比较浪费时间,建议先看文档,如有不懂再搜索相应视频进行学习),如果还是不会大可拷打学长学姐,如果他们也不会就狠狠嘲讽他。最后,学习的时候不能光看,光听,要实打实的去写一下,这样防止一学就会,一写就废。
示例网页:https://0nlinetech.littlemaster.fun/wp-content/uploads/2025/10/index.html
示例代码:Little-Master-fun/CSS3Teach2025
CSS内联与选择器
CSS内联方法
内联的作用是把你写的CSS给绑定到响应的HTML元素上,可分为以下几种方法
- 行内CSS
<p style="color:red">CSS</p>
直接写在标签内部,直观简洁
- 行外CSS
<style>
  #pcss {
    margin-top: 10px;
    margin-bottom: 10px;
  }
</style>
将CSS集中在style标签中,是运用最广泛的写法
- 外联CSS
<head>
  <link rel="stylesheet" href="index.css" />
</head>
可以在head中通过link标签引入其他人或自己写的CSS文件,极大简化你的代码格式
CSS选择器
选择器的作用是将行外CSS绑定到对应的元素上,有多种选择形式,不同的应用场景适用不同的选择器,合理运用选择器可以极大简化你CSS的长度
- 类选择器
类选择器又名class选择器,它可以通过HTML中的class属性绑定多个元素。在CSS中类选择器以 . 表示。
<body>
	<div class="redBox"></div>
	<div class="redBox blackBorder"></div>
</body>

<style>
.redBox{
	height: 100px;
	width: 100px;
	background-color: red;
}
.blackBorder{
	border: 5px solid rgb(0, 0, 0);
	width: 200px
}
</style>
一个class不仅可以多次绑定,一个元素也可以绑定多个class。如果多个class中有冲突的地方,采用最后加载的class,即class属性中靠后的优先级较高。
- ID选择器
ID选择器可以为特定id的HTML元素指定特定的样式,与类选择器不同的是id只能有一个,同时它的优先级高于类选择器。在CSS中ID选择器以“#”开头。写CSS时使用较少,多用于之后JS查找元素。
<body>
	<div id="redBox"></div>
</body>

<style>
#redBox{
		height: 100px;
		width: 100px;
		background-color: red;
}
</style>
ID属性不要以数字开头,数字开头的ID在 Mozilla/Firefox 浏览器中不起作用。
- 元素选择器
元素选择器可以将CSS绑定到HTML中某个标签上,它没有开头,直接用标签名进行绑定
<style>
p {
	  font-weight: 900;
	  text-align: center;
}
</style>
此句表示选中所有标签名为 p 的标签样式
- 组合选择器
组合选择器可以通过自己随意组合让CSS代码更高效、更精准的绑定。
( 1 )并列
在样式表中有很多具有相同样式的元素,使用并列可以极大缩减代码长度。
<style>
h1,h2,p
{
    color:green;
}
/*等同于*/
h1 {
    color:green;
}
h2 {
    color:green;
}
p {
    color:green;
}
</style>
( 2 )嵌套
嵌套可能适用于选择器内部的选择器的样式。
<style>
/*为所有 class="marked" 元素内的 p 元素指定这个样式*/
.marked p
{
    color:white;
}
/*为所有 class="marked" 的 p 元素指定这个样式*/
p.marked{
    text-decoration:underline;
}
/*选择<div>元素中所有直接子元素 <p> */
div>p
{
  background-color:yellow;
}
/*选取了所有位于 <div> 元素后的第一个 <p> 元素*/
div+p
{
  background-color:yellow;
}
/*选取了所有 <div> 元素之后的所有相邻兄弟元素 <p>*/
div~p
{
  background-color:yellow;
}
</style>
- 通配符选择器
表示选中所有标签的样式,一般用于去除默认样式,在CSS中用 * 表示。
<style>
* {
  margin: 0;
  padding: 0;
}
</style>
CSS样式优先级及覆盖问题
- 上述CSS选择器遵循一定的优先级原则,顺序是通配符选择器(
*)<类型选择器(h1)和伪元素<类选择器(.header)<ID选择器(#box)< 内联样式 (style='')<! important - 而同级别下的css样式重复会发生什么呢?如:
<style>
.yellow {
    background: yellow;
}

.red {
    background: red;
}
#blue{
		background: blue;
}
</style>
<body>
<div class="red yellow" id="blue" style="height:200px; width: 200px;"><div>
</body>
这个区域渲染出来是什么颜色呢?红色? 黄色? 答案是红色
通俗来讲在css文件中,权重相等时,谁声明在后面,那么最终就应用谁
练习
新建一个文件,里面创建image文件夹和index.html文件,把准备好的图片放入image文件夹,目录结构参考如下:
CSS3/
├── index.html
└── image/
    └── background.jpg
创建一个新的页面,在body中加入一个div标签,并通过类选择器进行绑定(本文取名为container,也可以根据自己喜好来)
<!DOCTYPE html>
<html lang="en">
<head>
  <meta charset="UTF-8">
  <meta name="viewport" content="width=device-width, initial-scale=1.0">
  <title>CSS3教程展示</title>
  <style>
    .container {
    }
  </style>
</head>
<body>
  <div class="container">

  </div>
</body>
</html>
单位大小及元素背景
常用大小单位
px是常用的绝对大小单位,表示一个像素,其实际大小难以描述,多尝试几个值便可 %是常用的相对大小单位,在不同的情况的相对的对象不同,多数情况与父级元素属性大小有关 vh和wh是基于视窗长宽的相对单位,wh是宽百分比,vh是长百分比
<style>
.box {
  height: 50vh;
  width: 50wh;
  background-color: red
}
</style>
rem 也是一种相对单位,但它相对的是根元素HTML的大小,做适配的时候较为常用
 <style>
      html {
      /*设置根元素大小,1rem = 12px*/
        font-size: 20px;
      }
      .box {
        width: 10rem;
        height: 10rem;
        background-color: orange;
      }
  </style>
  <body>
    <div class="box"></div>
  </body>
deg 是旋转单位,360 deg = 360° ,这里不再赘述
常用颜色单位
CSS广泛应用的color有三种,分别是
- 常用名red、black之类的。
RGBA,指的是Red,Green,Blue 三原色,按255等分······总之就是表示颜色的,最后再加一个透明度参数,范围为0~1,0为完全透明,1为不透明HEX,两位十六进制数,即六位十六进制来表示颜色,用#开头
 color: red;
 color: RGBA(150, 50, 50, 0.5);
 color: #000fff;
Background-背景
- background-color-背景颜色
用来设置网页元素的背景颜色
<style>
body
{
	background-color:#b0c4de;
}
</style>
- background-image
用来设置网页元素的背景图片
<style>
body {
  background-image: url("example.jpg");
}
</style>
- background-repeat
控制背景图片在元素中的平铺重复方式,常用取值:
repeat:水平和垂直方向都平铺重复(默认值)。repeat-x:只在水平方向平铺重复。repeat-y:只在垂直方向平铺重复。no-repeat:不平铺,只显示一次。
<style>
body {
  background-image: url("example.jpg");
  background-repeat: no-repeat;
}
</style>
- background-attachment
控制背景图像是随页面内容滚动还是固定,常用取值:
scroll:背景图随页面滚动(默认)。fixed:背景图固定,不随页面滚动。local:背景图随着元素的内容滚动。
<style>
body {
  background-image: url("example.jpg");
  background-attachment: fixed;
}
</style>
- background-position
设置背景图片在元素中的起始位置,常用取值:
- 关键字:
left、right、top、bottom、center。 - 百分比:
50% 50%表示水平垂直都居中。 - 像素:
10px 20px表示距离左边 10px,上边 20px。
<style>
body {
  background-image: url("example.jpg");
  background-repeat: no-repeat;
  background-position: center top; /* 中上位置 */
}
</style>
- background-size
设置背景图片的大小,控制它如何在元素内显示,常用取值:
- 关键字
auto:保持图片原始大小(默认)。cover:等比缩放,直到覆盖整个容器,可能会超出部分被裁剪。contain:等比缩放,直到完整显示图片,但可能留有空白区域。
- 长度值
- 可以使用像素、百分比等指定具体宽度和高度:
100px 50px→ 宽 100px,高 50px。50% 100%→ 宽度是容器的一半,高度和容器一样。
- 如果只写一个值,另一个会自动等比缩放。
- 可以使用像素、百分比等指定具体宽度和高度:
<style>
body {
  background-image: url("example.jpg");
  background-repeat: no-repeat;
  background-size: cover;   /* 背景图等比缩放,铺满整个容器 */
}
</style>
- background
这是一个简写属性,可以将上述的设置按照一定顺序写入这里,写入顺序是
- background-color
- background-image
- background-repeat
- background-attachment
- background-position
- background-size
<style>
body {
  background: #b0c4de url("example.jpg") no-repeat fixed center top / cover;
}
/* 等同于 */
body {
  background-color: #b0c4de;
  background-image: url("example.jpg");
  background-repeat: no-repeat;
  background-attachment: fixed;
  background-position: center top;
  background-size: cover;
}
</style>
练习
给元素添加样式,让它宽高铺满窗口,添加自己喜欢的背景图片
  <style>
    .main {
      width: 100%;
      height: 100vh;
      background-image: url('image/background.webp');
    }
  </style>
如果有同学在height处使用的是100%的话会发现页面中没有元素,这是因为body默认height是0,所以其子元素无法用%进行高定位
大概页面会是这个样子
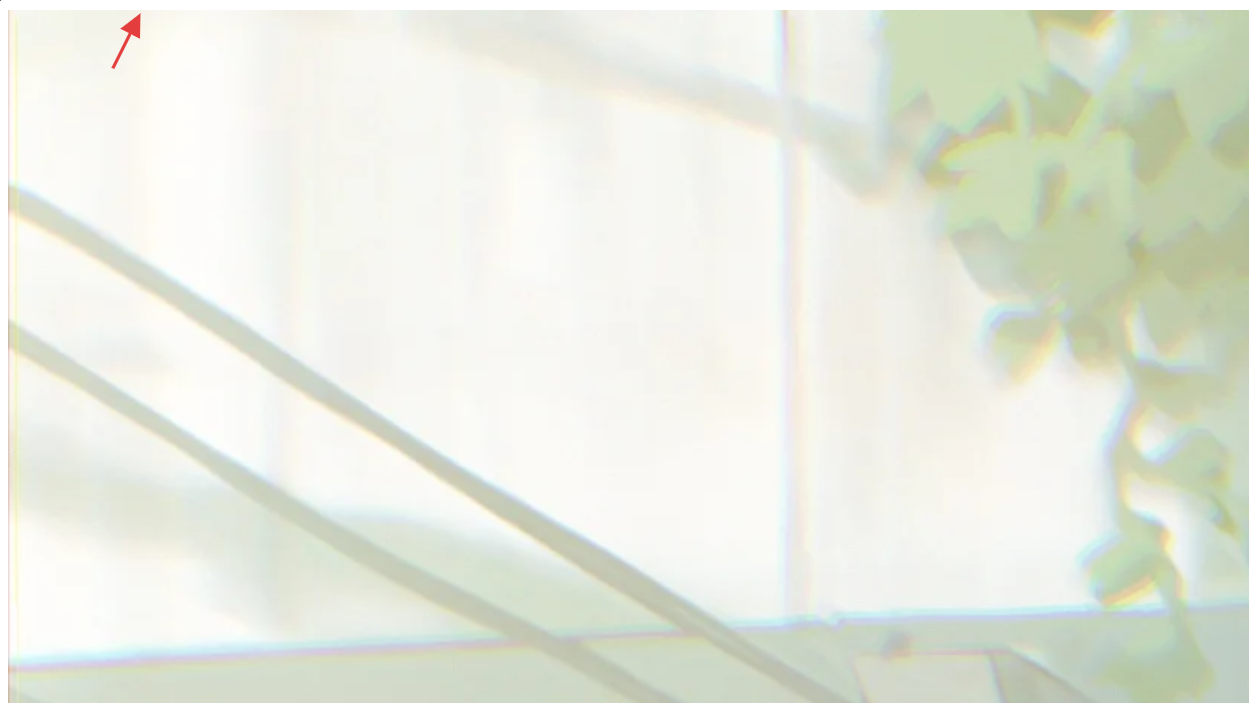
可见目前页面有一圈不明白边,图片大小不适应页面,图片不在中心,图片会出现重复情况(图里没有体现出来,但大概率是有的),我们来依次分析解决
- 不明白边:游览器有默认样式,
body和html会带有内边距,这样我们可以使用上面所说的通配符选择器来重置浏览器样式 - 图片大小不适:我们需要通过上述讲的
background-size来手动设置图片的大小适应方式,不让图片进行拉伸和溢出 - 图片重复:通过上面讲的
background-repeat来进行设置修改 - 图片不在中心:通过
background-position进行设置
  <style>
    *{
      margin: 0;
      padding: 0;
    }
    .main {
      width: 100%;
      height: 100vh;
      background-image: url('image/background.webp');
      background-repeat: no-repeat;
      background-size: cover;
      background-position: center;
    }
  </style>

可见页面正常
布局和定位
Display-布局
这里介绍display的五种属性:inline内联、block块级、none无、flex弹性盒、grid网格。重点介绍flex布局和grid布局。(不同的HTML标签有不同的display默认值,这里不再赘述,有需求可以自行查阅读)
- inline-内联
内联元素可以和相邻的内联元素在同一行
<style>
li{display:inline;}
</style>
<body>
	<ul>
		<li><a href="/html/" target="_blank">HTML</a></li>
		<li><a href="/css/" target="_blank">CSS</a></li>
		<li><a href="/js/" target="_blank">JavaScript</a></li>
		<li><a href="/xml/" target="_blank">XML</a></li>
	</ul>
</body>
- block-块元素
块元素表现为独占一行
<style>
span
{
	display:block;
}
</style>
<body>
	<span>block</span>
	<span>元素</span>
</body>
- none-无
表现为浏览器不加载
- flex-弹性盒
flex布局能够解决多数列或者行排列需求,弹性元素之间z-index属性被屏蔽。它的”弹性“来自于它可以增加尺寸以填满未使用的空间,也可以收缩尺寸以避免父元素溢出。而且子元素的水平对齐和垂直对齐都能很方便的进行操控。
( 1 )flex-direction
flex-direction用以定义主轴方向,即内部子元素的排列方向,包括四个值,row自左往右,row-reverse自右往左,column自上往下,column-reverse自下往上。
<style>
.box{
    height: 100px;
    width: 100px;
    background-color: antiquewhite;
    margin: 20px;
}
</style>

<body>
    <div style="display: flex; flex-direction: column;">
        <h1>这里元素是垂直排列</h1>
        <div class="box"></div>
        <div class="box"></div>
    </div>
    <div style="display: flex; flex-direction: row;">
        <h1>这里元素是水平排列</h1>
        <div class="box"></div>
        <div class="box"></div>
    </div>
</body>
( 2 )justify-content
justify-content用以定义弹性元素在主轴上的排列方式,有center居中排列,flex-start从主轴开始处排列,flex-end从主轴结束处排列,space-around均分间隔排列等值。
<style>
.box{
    height: 100px;
    width: 100px;
    background-color: antiquewhite;
    margin: 20px;
}
</style>

<body>
    <h1>center</h1>
    <div style="display: flex; flex-direction: row; justify-content: center;">
        <div class="box"></div>
        <div class="box"></div>
    </div>
    <h1>space-around</h1>
    <div style="display: flex; flex-direction: row; justify-content: space-around;">
        <div class="box"></div>
        <div class="box"></div>
    </div>
    <h1>flex-end</h1>
    <div style="display: flex; flex-direction: row; justify-content: flex-end;">
        <div class="box"></div>
        <div class="box"></div>
    </div>
    <h1>flex-start</h1>
    <div style="display: flex; flex-direction: row; justify-content: flex-start;">
        <div class="box"></div>
        <div class="box"></div>
    </div>
</body>
( 3 )align-items
align-items用以定义弹性元素在交叉轴上的排列方式,有center居中排列,start在交叉轴开始处排列,end在交叉轴结束处排列等值
<style>
.box{
    height: 100px;
    width: 100px;
    background-color: antiquewhite;
    margin: 20px;
}
.background{
    display: flex;
    height: 500px;
    flex-direction: row;
    background-color: aqua;
    justify-content: space-around;
}
</style>
<body>
    <h1>center</h1>
    <div class="background" style="align-items: center;">
        <div class="box"></div>
        <div class="box"></div>
    </div>
    <h1>start</h1>
    <div class="background" style="align-items: start;">
        <div class="box"></div>
        <div class="box"></div>
    </div>
    <h1>end</h1>
    <div class="background" style="align-items: end;">
        <div class="box"></div>
        <div class="box"></div>
    </div>
</body>
- grid-网格
grid是二维布局,可以用来划分页面,网格元素有z-index属性。
当一个元素的display值为grid时,该元素被称为网格容器,其子元素被称为网格元素。
( 1 )grid-template-columns
grid-template-columns代表的是列宽度,需要几列就输入几个值,如果宽度相同可以考虑用auto
( 2 )grid-template-rows
grid-template-rows 代表行高度,大体同grid-template-columns
( 3 )gap
gap代表每个网格间的间距
<style>
.grid-container {
  display: grid;
  grid-template-columns: auto auto auto;
  grid-template-rows: 80px 200px;
  gap: 10px;
  background-color: #2196F3;
  padding: 10px;
}

.grid-container > div {
  background-color: rgba(255, 255, 255, 0.8);
  text-align: center;
  padding: 20px 0;
  font-size: 30px;
}
</style>

**<body>
<div class="grid-container">
  <div>1</div>
  <div>2</div>
  <div>3</div>
  <div>4</div>
  <div>5</div>
  <div>6</div>
</div>
</body>**
- justify-content align-content
二者用法大体和flex中相同
position-定位
- fixed
相对于浏览器窗口是固定位置,不会随窗口滚动而滚动
<style>
p.pos_fixed
{
	position:fixed;
	top:30px;
	right:5px;
}
</style>
<body>
<p class="pos_fixed">固定位置</p>
<div style="height:1000px;width:200px"></div>
</body>
- relative
使用relative定位时相对的是元素的正常位置,但移动过后它原本占的位置不变,使用top、left等元素移动位置
h2
{
    position:relative;
    top:50px;
}
- absolute
absolute相对的是最近的position属性非默认值(static)的父级元素,如果没有已知定位的父级元素则它的定位是相对于<html>
<style>
h2
{
	position:absolute;
	left:100px;
	top:150px;
}
</style>

<body>
<h2>这是一个绝对定位了的标题</h2>
</body>
练习
让我们创建一个在页面居中的登入卡片(本文使用absolute定位实现,同学们可以考虑如何使用display实现)
<body>
  <div class="main">
    <div class="container">
      <div>

      </div>
    </div>
  </div>
</body>
 <style>
    .container {
		  width: 400px;                                  /* 卡片容器固定宽度(教程示例尺寸) */
		  height: 300px;                                 /* 固定高度(示例) */
		  position: absolute;                            /* 绝对定位基于视口/父容器进行 */
		  top: 50%; left: 50%;                           /* 将左上角定位到视口中心 */
		  z-index: 2;                                    /* 层级,内容容器在遮罩之上,这个后面会提到 */
    }
 </style>
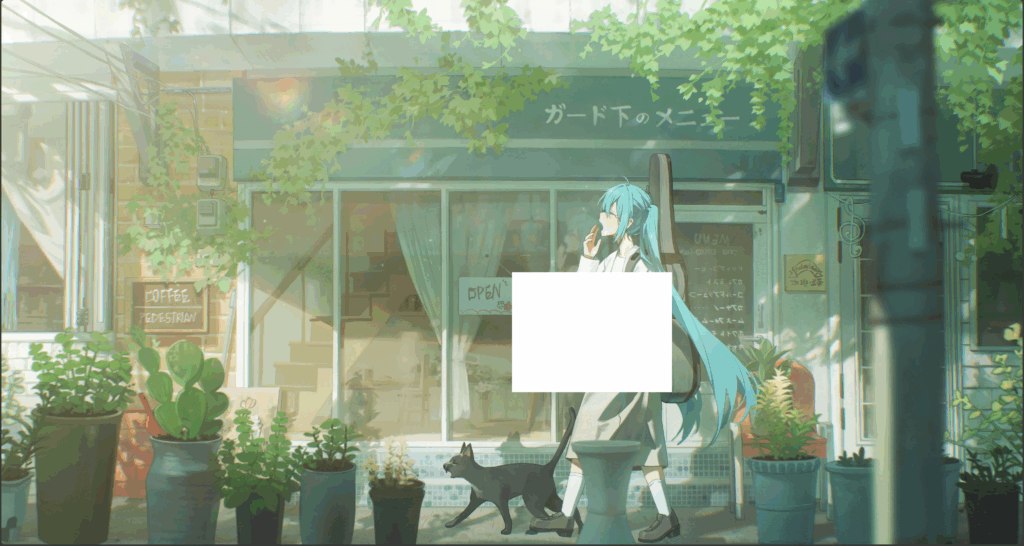
可见卡片并没有居中,而是左上角在中心,因为absolute的定位点并不是元素中心,这里我们使用一下transform属性,它可以将将元素在X轴和Y轴移动自身长度
 <style>
    .container {
		  width: 400px;                                  /* 卡片容器固定宽度(教程示例尺寸) */
		  height: 300px;                                 /* 固定高度(示例) */
                  background-color:white;
		  position: absolute;                            /* 绝对定位基于视口/父容器进行 */
		  top: 50%; left: 50%;                           /* 将左上角定位到视口中心 */
		  transform: translate(-50%, -50%);              /* 再向左上偏移自身 50% 实现真正居中 */
		  z-index: 2;                                    /* 内容容器在遮罩之上 */
    }
 </style>
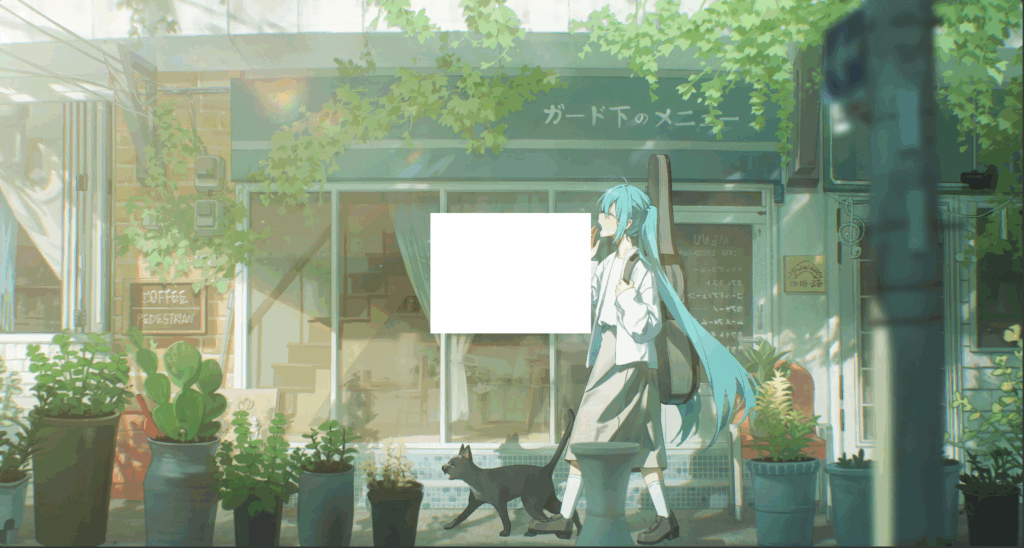
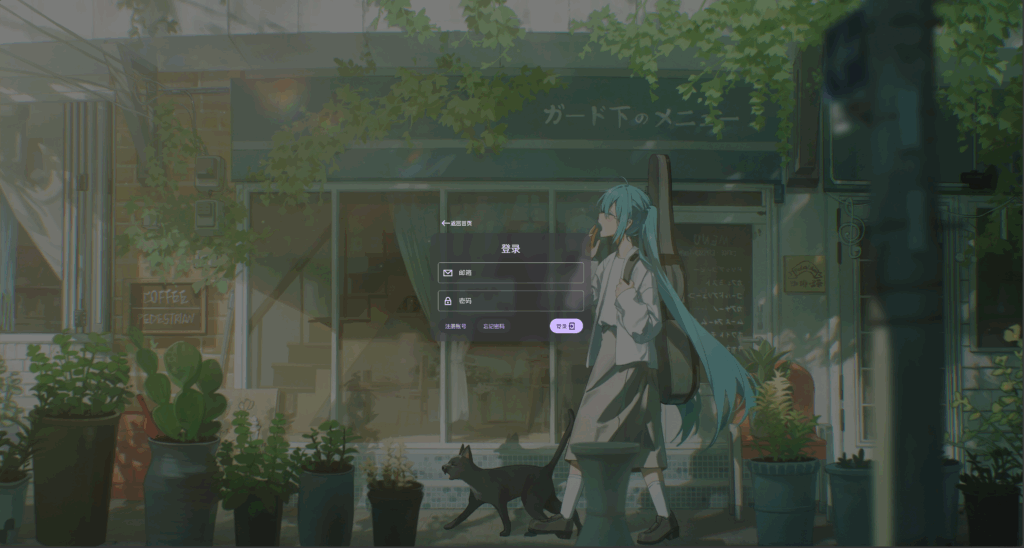
可见卡片已经成功居中,然后我们取消main的背景色,之前添加只是方便定位查看
接下来我们进行卡片内容的书写,主要是四个按钮、一个标题和两个输入框
<body>
  <div class="main">
    <div class="container">
      <div class="header">
        <button>
          返回首页
        </button>
      </div>
      <div class="card">
        <h1>登录</h1>
        <div class="input-group">
          <input type="email" id="email" placeholder="邮箱">
        </div>
        <div class="input-group">
          <input type="password" id="password" placeholder="密码">
        </div>
        <div class="card-footer">
          <div>
            <button>注册账号</button>
            <button>忘记密码</button>
          </div>
          <button>
            登录
          </button>
        </div>
      </div>
    </div>
  </div>
</body>
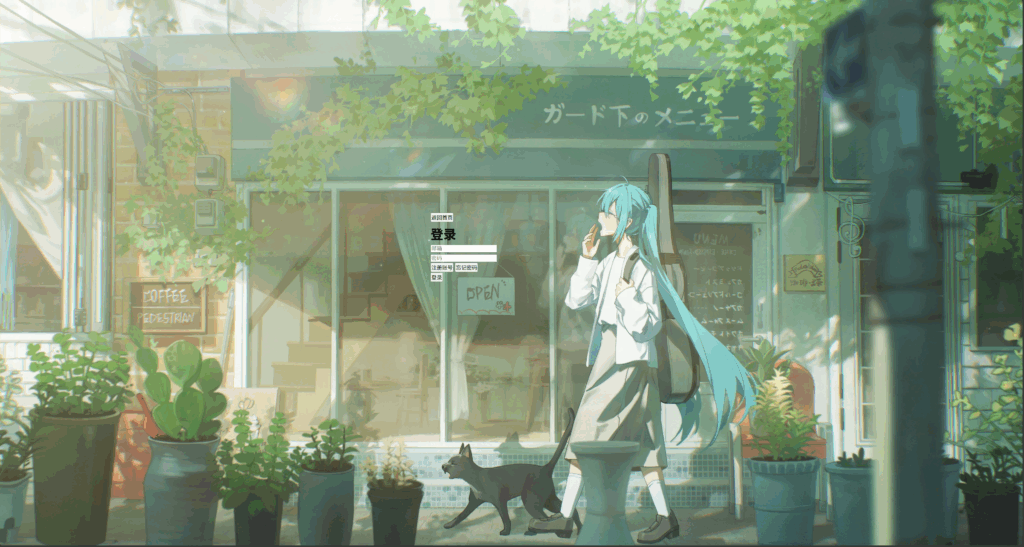
我们给头部和卡片一个高度,再给卡片一个半透明背景,让卡片内部进行垂直排列,水平居中,那么我们可以使用提到的flex布局(当然gird也是可以的)
<style>
    .card{
      width: 100%;
      height: 90%;
      background-color: rgba(54, 52, 59, 0.5);
      backdrop-filter: blur(5px);                    /* 布尔模糊 */
      display: flex;
      flex-direction: column;
      justify-content: space-between;
      align-items: center;
    }
     .header{
      width: 100%;
      height: 10%;
    }
</style>
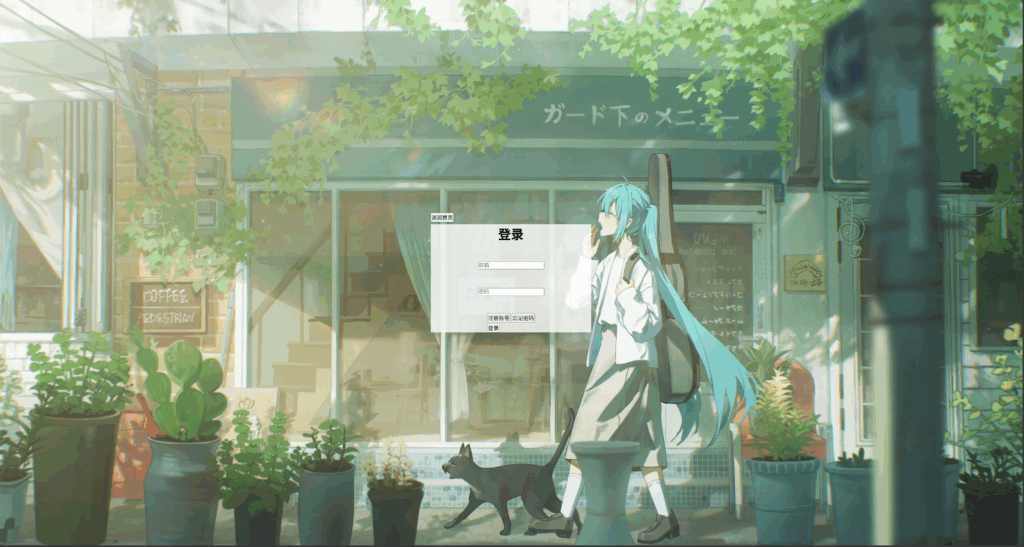
请不要惊讶颜色不一样,因为刚开始写的时候使用的是白色,但是到伪元素教学时添加了一个黑幕效果,所以又把卡片背景颜色也改成黑色主题的了。接下来我们再再让底部元素水平排布
<style>
    .card-footer{
      width: 100%;
      display: flex;
      justify-content: space-between;
      align-items: center;
    }
</style>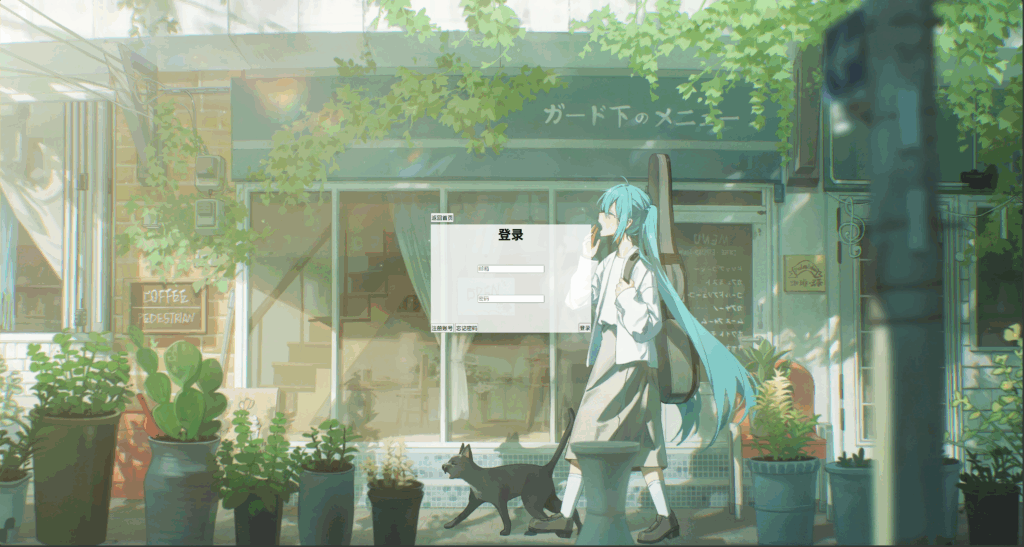
内外边距及边框与阴影
Box-Model-盒子模型
所有的HTML元素都可以看作一个盒子,而CSS Box-Model本质上也是个盒子,相当于一个元素二点占位由四个部分组成,它包括margin外边距,border边框,padding内边距,content内容

<style>
.box{
		padding: 10px;
		background-color: antiquewhite;
		border: 5px solid black;
		margin: 20px;
}
</style>
<body>
    <p class="box">Box-Model</p>
</body>
margin、padding、border都可以接收四个参数,分别代表上、右、下、左的属性
Border-边框
- border-radius-圆角
设置边框圆角,可接受1~4个参数,1个参数则设置4个圆角半径,4个参数则是分别设置四个圆角半径,顺序是从左上开始顺时针顺序
div.ellipse
{
border-radius: 15px 50px 30px 5px;
}
div.circul
{
border-radius: 5px;
}
- border-color-边框颜色
设置边框颜色
border-color:red
- border-width-边框宽度
设置边框宽度,接收thin细、medium中、thick粗和自定义大小,顺序类似于redius,从上边框开始
border-width: thin medium thick 10px;
border-width: 10px;
- border-style-边框样式
border-style有很多值,这里介绍常用的几个,none无,solid实线,hidden隐藏
border-style:none;
border-style:solid;
border-style:hidden;
- border-简写属性
border可将上述属性写在一起,顺序是
- border-width
- border-style
- border-color
border: medium solid green;
阴影
div {
  box-shadow: 2px 2px 7px black;
}
box-shadow 为简写属性,第一个值为 x 轴偏移量,影响横向的阴影,第二个值为 y 轴偏移量,影响纵向的阴影,第三个值为虚化程度,影响阴影虚化,第四个值为颜色 一般而言,虚化程度要比偏移量值大,实际情况自行调整
练习
让我们来继续美化一下我们的页面样式,首先是圆角和内边距的添加,让页面看起来更加优雅美观
<style>
	.card{
	  width: 100%;                                   /* 卡片宽度占满容器 */
	  height: 90%;                                   /* 除去 10% 头部,其余给卡片主体 */
	  background-color: rgba(54, 52, 59, 0.5);       /* 半透明底色(配合遮罩形成玻璃感) */
	  border-radius: 20px;                           /* 大圆角,弱化边缘 */
	  box-shadow: 0 15px 35px rgba(0,0,0,0.2);       /* 软阴影,增强层次 */
	  padding: 20px;                                 /* 内边距,避免内容贴边 */
	  box-sizing: border-box;                        /* 包含内边距/边框,便于尺寸预估 */
	  display: flex;                                 /* 启用弹性布局 */
	  flex-direction: column;                        /* 垂直方向排布 */
	  justify-content: space-between;                /* 上中下分布,留出自然间隔 */
	  align-items: center;                            /* 横向居中对齐 */
	  backdrop-filter: blur(5px);                    /* 毛玻璃效果(现代浏览器支持) */
	}
</style>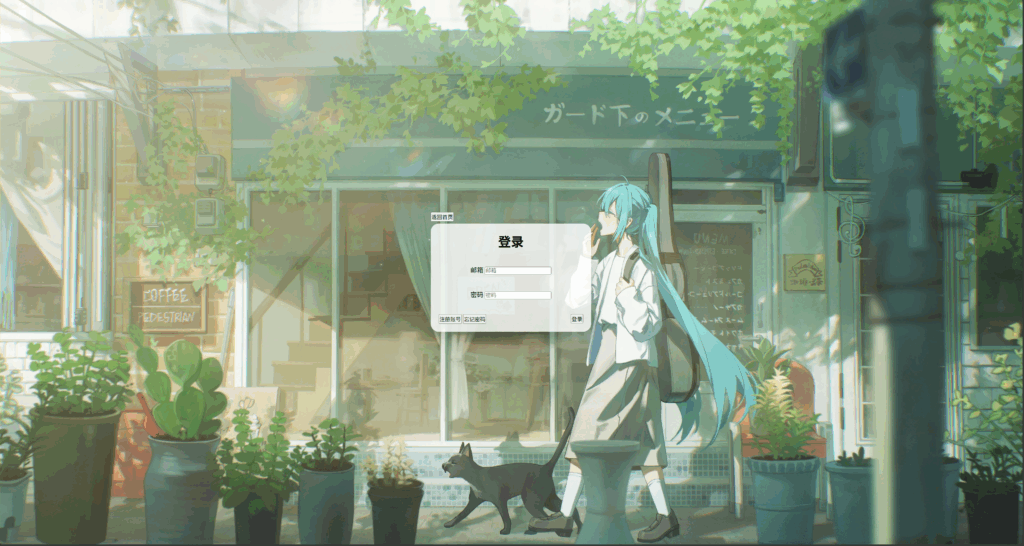
怎么样,看起来是不是自然很多。接下来我们使用选择器来进行按钮与输入框的默认样式重写,我们先设置输入框的容器正确的宽高、排版和边框
<style>
	.input-group{
	  width: 95%;                                    /* 与卡片留出微小内边距 */
	  display: flex;                                 /* 图标与输入框一行排列 */
	  justify-content: space-around;                 /* 两端均衡留白(含图标) */
	  align-items: center;                            /* 垂直居中对齐 */
	  padding: 10px;                                 /* 容器内衬,扩大可点击/可触区 */
	  border: 1px solid #ccc;                        /* 轻边框,强调输入区域 */
	  border-radius: 5px;                            /* 小圆角,呼应卡片圆角 */
	}
</style>
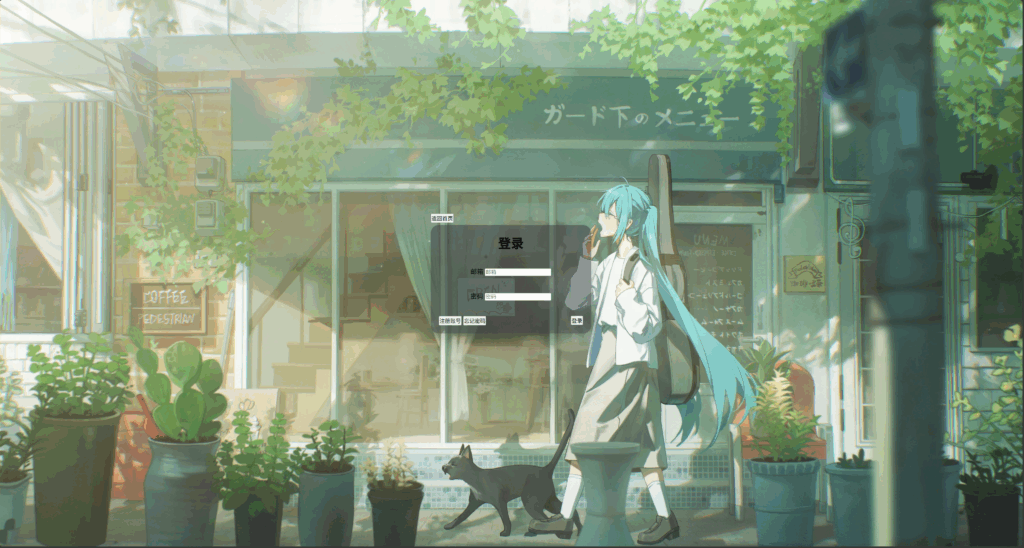
再修改input的样式
<style>
	.input-group input{
	  width: 90%;                                    /* 让输入框占据主要可用空间 */
	  height: 30px;                                  /* 统一输入高度 */
	  border: none;                                  /* 去掉原生边框 */
	  border-radius: 5px;                            /* 与容器相呼应的小圆角 */
	  padding: 0 10px;                               /* 左右内边距,提升可读性 */
	  box-sizing: border-box;                        /* 包含内边距,避免溢出 */
	  background: none;                              /* 透明背景,露出卡片底色 */
	  outline: none;                                 /* 取消默认 focus 外轮廓(视觉统一) */
	  color: white;                                  /* 文字白色,与深色底形成对比 */
	}
</style>
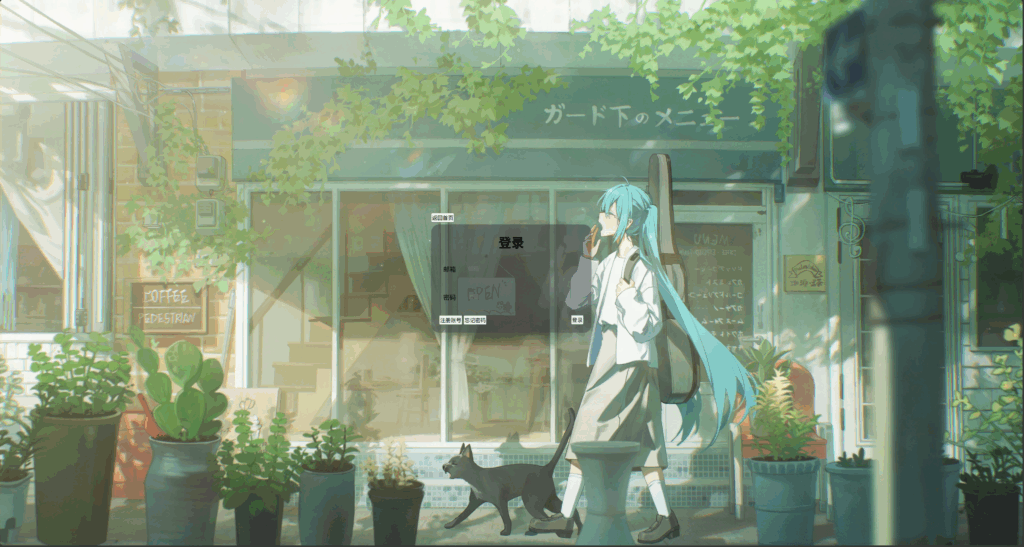
好看很多吧,其中outline: none; 是为了消除点击输入框时浮现出的那一圈边框,如果不清楚是什么,可以删除属性后点击输入框。然后我们来修改按钮样式,先来改卡片底部按钮吧(这里使用flex布局是为了后续图标的顺利加入)
<style>
	.card-footer button{
	  height: 36px;                                  /* 统一按钮高度 */
	  padding: 0 16px;                               /* 左右内边距,保证触控面积 */
	  border: none;                                  /* 去默认边框 */
	  border-radius: 100px;                          /* 胶囊形态 */
	  background-color: #D0BCFF;                     /* 按钮底色(示例配色) */
	  color: #381E72;                                /* 文本与图标颜色对比明确 */
	  cursor: pointer;                               /* 悬浮指针,提示可点击 */
	  display: flex;                                  /* 按钮内:文案 + 图标水平排列 */
	  justify-content: center;
	  align-items: center;
	}
</style>
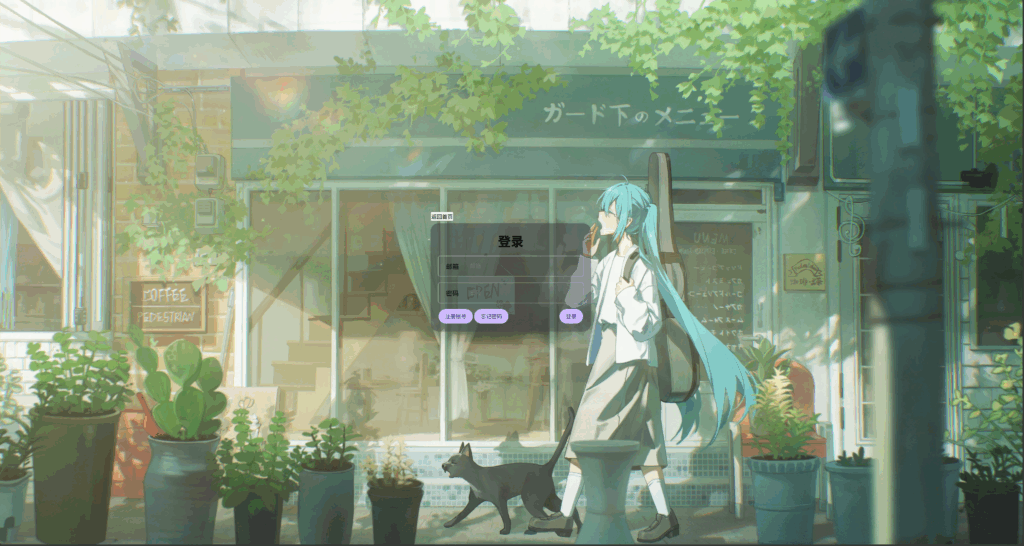
现在我想要单独设置前两个按钮样式,该怎么办呢?该组合选择器发力了
<style>
    .card-footer>div button{
      background-color: #3B383E;
      color: #D0BCFF;
      margin-right: 10px;
    }
</style>
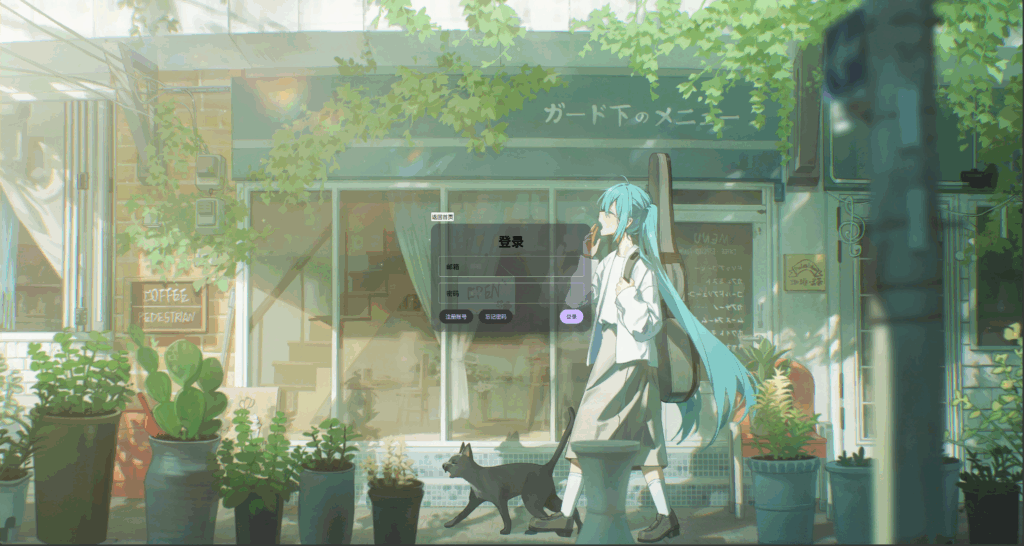
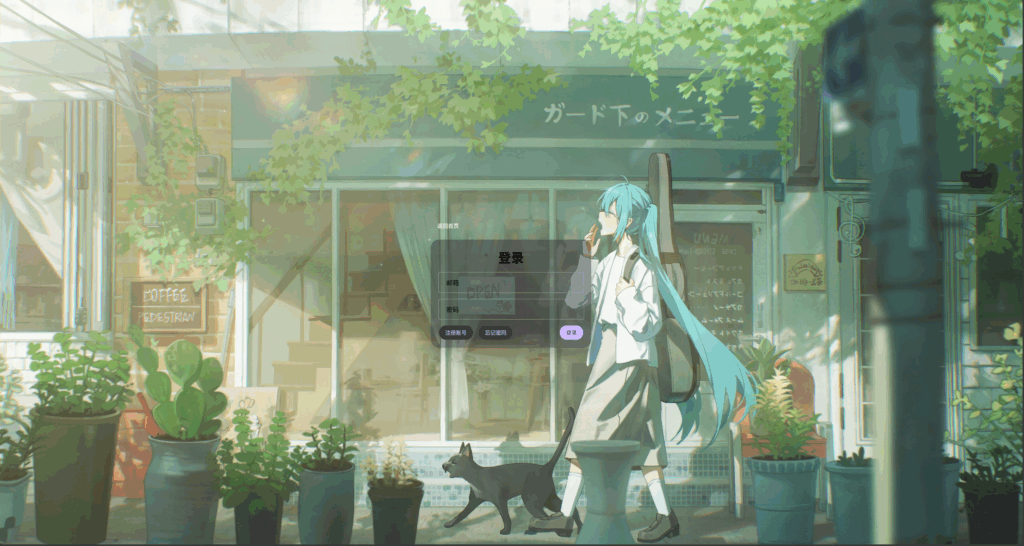
然后来修改头部的按钮,先设置头部合适的宽度和内边距,再让按钮背景透明
<style>
	.header{
	  display: flex;                                  /* 头部采用水平弹性布局 */
	  justify-content: flex-start;                    /* 返回按钮靠左 */
	  align-items: center;                            /* 垂直居中 */
	  padding: 10px 10px;                             /* 头部内边距(你的现值) */
	}

	/* 头部按钮(图标 + 文案) */
	.header button{
	  background: none;                               /* 背景透明,保持轻量 */
	  border: none;                                   /* 无边框,依赖 hover/active 反馈 */
	  color: white;                                   /* 与深色背景对比明显 */
	  cursor: pointer;                                /* 指针样式 */
	  display: flex;                                   /* 图标 + 文案水平排列 */
	  justify-content: center;
	  align-items: center;
	  padding: 8px 16px;                              /* 扩大可点区域 */
	  border-radius: 100px;                           /* 小胶囊 */
	}
</style>
文字和图标
文本
- text-align-文本对齐
<style>
h1 {text-align:center}
h2 {text-align:left}
h3 {text-align:right}
</style>

<body>
<h1>Center</h1>
<h2>Left</h2>
<h3>Right</h3>
</body>
注意,对齐是以父元素为基准
- text-decoration-文本修饰
常用的underline 下划线、overline标头线 、line-through删除线
<body>
<h1 style="text-decoration:overline">标头线</h1>
<h1 style="text-decoration:underline">下划线</h1>
<h1 style="text-decoration:line-through">删除线</h1>
</body>
- text-indent-首行缩进
设置每段文本第一行的缩进距离
p {text-indent:50px;}
- font-family-字体
设置字体格式,可以多设置几个值,部分浏览器不支持第一个字体的时候会自动加载第二个字体
p{font-family:"宋体", Times, serif;}
- font-size-字体大小
设置字体大小
p {font-size:14px;}
- font-weight-字体粗细
有normal、lighter、bold等值,也支持500、600、700······自定义粗细
p.normal {font-weight:normal;}
p.light {font-weight:lighter;}
p.thick {font-weight:bold;}
p.thicker {font-weight:900;}
- text-overflow-文本溢出
设置当文本溢出容器所表现的样式,常用的有ellipsis用省略号代替、clip剪切剩余部分
<body>
		<div class="test" style="text-overflow:ellipsis;">This is some long text that will not fit in the box</div>
		<div class="test" style="text-overflow:clip;">This is some long text that will not fit in the box</div>
</body>
<style>
.test
{
	white-space:nowrap;
	width:20px;
	overflow:hidden;
	border:1px solid #000000;
}
</style>
SVG图标
SVG (Scalable Vector Graphics)是一种基于XML 的矢量图形格式。它的特点是图像由路径(线条、曲线、形状)组成,而不是像素点。平时我们只用复制其SVG代码过来使用即可(Bootstrap Icons · Official open source SVG icon library for Bootstrap)
练习
像项目中添加图标
<body>
  <div class="main">
    <div class="container">
      <div class="header">
        <button>
          <svg xmlns="<http://www.w3.org/2000/svg>" role="img" width="24px" height="24px" viewBox="0 0 24 24" aria-labelledby="arrowLeftIconTitle" stroke="#FFF" stroke-width="2" stroke-linecap="square" stroke-linejoin="miter" fill="none" color="#FFF"> <title id="arrowLeftIconTitle">Arrow Left</title> <path d="M9 6l-6 6 6 6"/> <path d="M21 12H4"/> <path stroke-linecap="round" d="M3 12h1"/> </svg>
          返回首页
        </button>
      </div>
      <div class="card">
        <h1>登录</h1>
        <div class="input-group">
          <svg xmlns="<http://www.w3.org/2000/svg>" role="img" width="24px" height="24px" viewBox="0 0 24 24" aria-labelledby="envelopeAltIconTitle" stroke="#FFF" stroke-width="2" stroke-linecap="square" stroke-linejoin="miter" fill="none" color="#FFF"> <title id="envelopeAltIconTitle">Envelope</title> <rect width="20" height="14" x="2" y="5"/> <path stroke-linecap="round" d="M2 5l10 9 10-9"/> </svg>
          <input type="email" id="email" placeholder="邮箱">
        </div>
        <div class="input-group">
          <svg xmlns="<http://www.w3.org/2000/svg>" role="img" width="24px" height="24px" viewBox="0 0 24 24" aria-labelledby="lockAltIconTitle" stroke="#FFF" stroke-width="2" stroke-linecap="square" stroke-linejoin="miter" fill="none" color="#FFF"> <title id="lockAltIconTitle">Lock</title> <rect width="14" height="10" x="5" y="11"/> <path d="M12,3 L12,3 C14.7614237,3 17,5.23857625 17,8 L17,11 L7,11 L7,8 C7,5.23857625 9.23857625,3 12,3 Z"/> <circle cx="12" cy="16" r="1"/> </svg>
          <input type="password" id="password" placeholder="密码">
        </div>
        <div class="card-footer">
          <div>
            <button>注册账号</button>
            <button>忘记密码</button>
          </div>
          <button>
            登录
            <svg xmlns="<http://www.w3.org/2000/svg>" role="img" width="24px" height="24px" viewBox="0 0 24 24" aria-labelledby="entranceIconTitle" stroke="#381E72" stroke-width="2" stroke-linecap="round" stroke-linejoin="round" fill="none" color="#381E72"> <title id="entranceIconTitle">Entrance</title> <path d="M11 15l3-3-3-3"/> <path d="M4.5 12H13"/> <path stroke-linecap="round" d="M14 12h-1"/> <path d="M18 4v16H7V4z"/> </svg>
          </button>
        </div>
      </div>
    </div>
  </div>
</body>
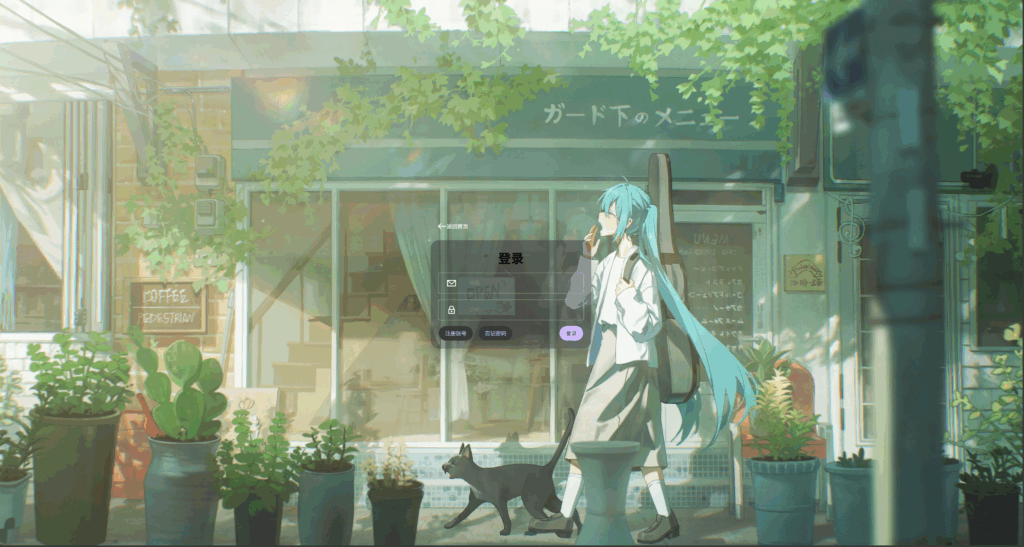
修改文中字体大小与颜色
<style>
    *{
      margin: 0;
      padding: 0;
      font-family: inherit; /* 设置全局字体 */
      font-weight: inherit;
    }
    .card h1{
      color: white;
      font-size: 24px;
    }
    .input-group input::placeholder{
      color: #ccc;                                   /* 占位符浅灰 */
      font-size: 16px;                               /* 合理字级(与正文协调) */
    }
</style>
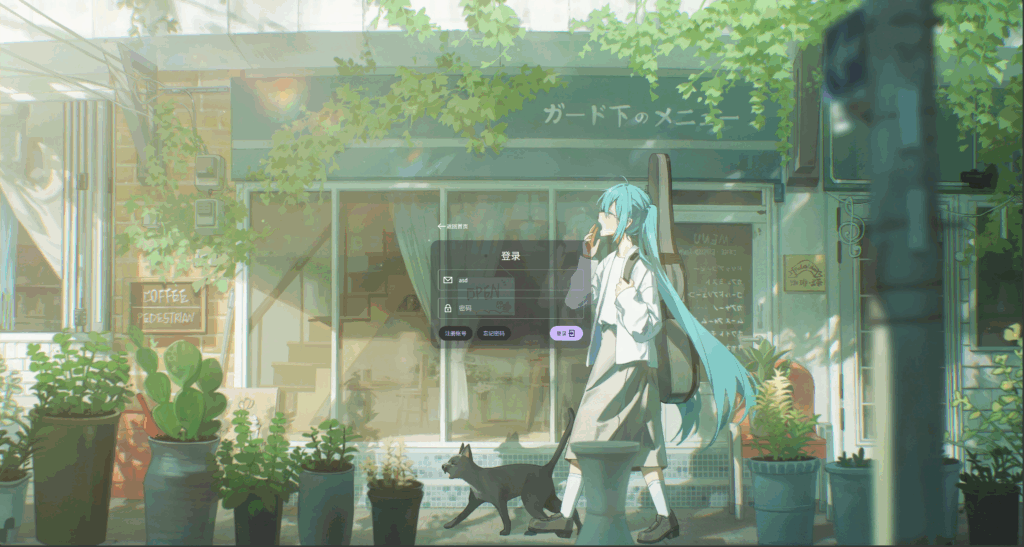
伪类和伪元素
伪类
伪类常用于添加一些选择器的通用效果,CSS中在选择器后加一个:再加伪类名称可用于表伪类,伪类是在特殊情况下才会触发的样式
:hover
当鼠标移至元素上时所添加的类
<style>
.box{
    background-color: antiquewhite;
    width: 100px;
    height: 100px;
}
.box:hover{
    width: 200px;
}
</style>

<body>
    <div class="box"></div>
</body>
:active
当鼠标点击元素的时候所添加的类
<style>
.box{
    background-color: antiquewhite;
    width: 100px;
    height: 100px;
}
.box:active{
    width: 200px;
}
</style>

<body>
    <div class="box"></div>
</body>
:focus
当元素获得焦点(鼠标点击)后所添加的类(多用于表单)
<style>
.box{
		background-color: antiquewhite;
		width: 100px;
		height: 100px;
}
.box:active{
		width: 200px;
}
</style>

<body>
    <div class="box"></div>
</body>
注意:hover,focus,active则必须按照focus–hover–active这个顺序书写,一旦出现排列错误就很有可能形成覆盖,导致其中某个样式无法显示
<style>
a:focus{
	background-color:red;
}
a:hover {
	background-color:yellow;
}
a:active{
	background-color:black;
}
</style>
<body>
<a href="#">CSS伪类顺序</a>
</body>
伪元素
这里介绍两个常用的伪元素,:before和:after,:before可以在选择的元素前添加内容,:after可以在选中的元素后添加内容
<style>
h1:before {
content:'这是添加的before内容';
}
h1:after {
content:'这是添加的after内容';
}
</style>

<body>
<h1>这是原内容</h1>
</body>
练习
让我们用伪类给按钮添加悬浮变化效果,用伪元素给背景添加一个半透明的黑色遮罩
<style>
		.main::after {
		  content: "";                                   /* 生成伪元素盒 */
		  position: absolute;                            /* 绝对定位覆盖容器 */
		  top: 0; left: 0;
		  width: 100%; height: 100%;                     /* 覆盖整块背景区域 */
		  background-color: rgba(0, 0, 0, 0.5);          /* 半透明黑色遮罩 */
		  z-index: 1;                                    /* 遮罩位于背景之上(容器内容会比它更高) */
		}
		.card-footer button:hover{
		  background-color: rgb(186, 166, 233);          /* 悬浮变亮,突出可交互 */
		}
		.card-footer button:active{
		  background-color: rgb(166, 148, 207);          /* 按下微暗,模拟按压感 */
		}

		/* 次级按钮容器:与主按钮分组布局 */
		.card-footer>div{
		  display: flex;
		  justify-content: center;
		  align-items: center;
		}
		/* 次级按钮:深色底 + 浅色字,区分主次层级(仍保留一致的形态语言) */
		.card-footer>div button{
		  background-color: #3B383E;
		  color: #D0BCFF;
		  margin-right: 10px;                            /* 两个次级按钮之间的间距 */
		}
		/* 次级按钮的悬浮/按下反馈(练习七) */
		.card-footer>div button:hover{
		  background-color: rgba(92, 82, 115, 1);
		}
		.card-footer>div button:active{
		  background-color: rgb(68, 61, 85);
		}
</style>

动画
Transform-转换
transform是一个简写属性,通过它我们可以实现元素的translate-位移、rotate-旋转、scale-缩放、skew-x、-y倾斜
<style>
.box{
		background-color: antiquewhite;
		width: 100px;
		height: 100px;
}
.box:hover{
		transform: translate(30px,20px) rotate(30deg) scale(2);
}
</style>

<body>
    <div class="box"></div>
</body>
Transition-过渡
transition其实是一个简写属性,它的简写顺序是 transition-property、transition-duration、transition-timing-function 和 transition-delay(附赠链接,感兴趣可以自己深入了解一下)。大部分是搭配伪类使用。常用写法为 需要变化的CSS属性名 + 变化时间 + 延迟时间(延时时间前需加一个.),多个转换用,隔开
<style>
.box{
		background-color: antiquewhite;
		width: 100px;
		height: 100px;
		transition: width 2s .2s, transform 2s;
}
.box:hover{
		width: 200px;
		transform: translate(30px,20px) rotate(30deg);
}
</style>

<body>
    <div class="box"></div>
</body>
@keyframes animation-关键帧动画
@keyframes可以创建关键帧动画,通过百分数去打下一个关键帧,创建完动画后通过animation调用
<style>
.box{
		background-color: antiquewhite;
		width: 100px;
		height: 100px;
		animation: myfirst 5s;
}
@keyframes myfirst{
from {
    background-color: brown;
}
50% {
    background-color: yellow;
}
to {
    background-color: antiquewhite;
}
}
</style>

<body>
    <div class="box"></div>
</body>
练习
给button的颜色变化添加时间,让过渡更加平滑
<style>
    button {
      transition: 0.5s;
    }
</style>
进阶练习
此练习项难度较高,主要是通过label标签替换placeholder,利用伪类监听用户点击输入框动作,进行响应的动画播放,涉及动画、定位、伪元素、标签绑定
<style>
            /* 输入框容器增强:支持浮动标签定位 */
      .input-group {
        position: relative; /* 为浮动标签提供定位基础 */
        transition: border-color 0.3s ease; /* 边框颜色过渡动画 */
      }

      /* 输入框容器(包含input和label) */
      .input-wrapper {
        position: relative; /* 为浮动标签提供定位基础 */
        width: 90%; /* 占据主要可用空间 */
        display: flex;
        flex-direction: column;
      }

      /* 输入框样式调整:支持浮动标签 */
      .input-group input {
        width: 90%; /* 让输入框占据主要可用空间 */
      }

      /* 浮动标签样式 */
      .input-group label {
        position: absolute; /* 绝对定位,可以移动到不同位置 */
        left: 10px; /* 初始位置在输入框内 */
        top: 50%; /* 垂直居中 */
        transform: translateY(-50%); /* 精确垂直居中 */
        color: #ccc; /* 初始颜色为浅灰 */
        font-size: 16px; /* 初始字体大小 */
        pointer-events: none; /* 禁用鼠标事件,点击时穿透到input */
        transition: all 0.3s ease; /* 所有变化都有过渡动画 */
        padding: 0 4px; /* 左右留白,避免与边框贴合 */
        z-index: 1; /* 确保在输入框之上 */
      }

      /* 输入框获得焦点时的样式 */
      .input-group:focus-within {
        border-color: #d0bcff; /* 焦点时边框变为品牌色 */
      }

      /* 输入框获得焦点或有内容时,标签移动到上方 */
      .input-group input:focus + label,
      .input-group input:not(:placeholder-shown) + label {
        top: -30px; /* 移动到输入框上方 */
        left: -36px; /* 稍微向左调整位置 */
        transform: translateY(0); /* 取消垂直居中变换 */
        font-size: 12px; /* 字体变小 */
        color: #d0bcff; /* 变为品牌色 */
      }
 </style>

 <body>
	 <div class="input-group">
	  <svg
	    xmlns="<http://www.w3.org/2000/svg>"
	    role="img"
	    width="24px"
	    height="24px"
	    viewBox="0 0 24 24"
	    aria-labelledby="envelopeAltIconTitle"
	    stroke="#FFF"
	    stroke-width="2"
	    stroke-linecap="square"
	    stroke-linejoin="miter"
	    fill="none"
	    color="#FFF"
	  >
	    <title id="envelopeAltIconTitle">Envelope</title>
	    <rect width="20" height="14" x="2" y="5" />
	    <path stroke-linecap="round" d="M2 5l10 9 10-9" />
	  </svg>
	  <div class="input-wrapper">
	    <input type="email" id="email" placeholder=" " />
	    <label for="email">邮箱</label>
	  </div>
	</div>
	<div class="input-group">
	  <svg
	    xmlns="<http://www.w3.org/2000/svg>"
	    role="img"
	    width="24px"
	    height="24px"
	    viewBox="0 0 24 24"
	    aria-labelledby="lockAltIconTitle"
	    stroke="#FFF"
	    stroke-width="2"
	    stroke-linecap="square"
	    stroke-linejoin="miter"
	    fill="none"
	    color="#FFF"
	  >
	    <title id="lockAltIconTitle">Lock</title>
	    <rect width="14" height="10" x="5" y="11" />
	    <path
	      d="M12,3 L12,3 C14.7614237,3 17,5.23857625 17,8 L17,11 L7,11 L7,8 C7,5.23857625 9.23857625,3 12,3 Z"
	    />
	    <circle cx="12" cy="16" r="1" />
	  </svg>
	  <div class="input-wrapper">
	    <input type="password" id="password" placeholder=" " />
	    <label for="password">密码</label>
	  </div>
	</div>
 </body>
@media-多媒体查询
多媒体查询(Media queries)非常实用,尤其是当你想要根据设备的大致类型(如打印设备与带屏幕的设备)或者特定的特征和设备参数(例如屏幕分辨率和浏览器视窗宽度)来修改网站或应用程序时。媒体查询的功能很多,这里主要介绍根据视窗大小做一些响应式网页,感兴趣的可以自行了解。
多媒体查询由多种媒体组成,可以包含一个或多个表达式,表达式根据条件是否成立返回 true 或 false。如果指定的多媒体类型匹配设备类型则查询结果返回 true,文档会在匹配的设备上显示指定样式效果。
常用的媒体查询的语法大致是@media + 查询事务 + and + (条件)
/*这里查询的是屏幕大小,条件是宽度小于等于480px,若匹配,则执行后面的CSS*/
@media screen and (max-width: 480px) {}
简单示例
<style>
body {
    background-color: pink;
}

@media screen and (max-width: 480px) {
    body {
        background-color: lightgreen;
    }
}
</style>

<body>

<h1>重置浏览器窗口查看效果!</h1>
<p>如果媒体类型屏幕的可视窗口宽度小于 480 px ,背景颜色将改变。</p>

</body>
练习
让卡片大小在屏幕宽小于768px时,变得更小,这里就先不写教程了,写不动了,先吃饭吧,吃完再写,拜拜~
吃完也写不了了,又来活了(╥﹏╥)
内容补充
Overflow-溢出
在多数情况下我们写的子元素会超出父元素容器产生溢出情况,这时候就可以使用overflow来设置相应的显示模式。visible内容会超出父容器(默认值),hidden超出父容器的部分会被裁剪至不可见,scroll显示滚动条,可查看被裁剪部分,auto如果内容被裁剪则显示滚动条
<style>
div {
    background-color: #eee;
    width: 200px;
    height: 50px;
    border: 1px dotted black;
    overflow: auto;
}
</style>

<body>
<div class="overflowTest">
<p>这里的文本内容会溢出元素框。</p>
<p>这里的文本内容会溢出元素框。</p>
<p>这里的文本内容会溢出元素框。</p>
</div>
</body>
常见对齐
1.水平居中
(1)margin:auto
使用margin:auto元素会自动调整左右外边距,达到水平居中效果
<style>
.center {
    margin: auto;
    width: 60%;
    border: 3px solid #73AD21;
    padding: 10px;
}
</style>

<body>
<div class="center">
  <p>水平居中</p>
</div>
</body>
(2)text-align:center
用于文本居中对齐
<style>
.center {
    margin: auto;
    text-align: center;
    width: 60%;
    border: 3px solid #73AD21;
    padding: 10px;
}
</style>

<body>
<div class="center">
  <p>水平居中</p>
</div>
</body>
2.垂直居中
(1)padding
用padding代替height使上下内边距相同,达到垂直居中
<style>
.center {
    padding: 70px 0px;
    border: 3px solid green;
}
</style>

<body>
<div class="center">
  <p>我是垂直居中的。</p>
</div>
</body>
(2)position
<style>
.center {
    height: 200px;
    position: relative;
    border: 3px solid green;
}

.center p {
    margin: 0;
    position: absolute;
    top: 50%;
}
</style>

<body>
<div class="center">
  <p>我是垂直居中的。</p>
</div>
</body>
3.子元素居中
(1)flex
<body>
<div class="parent">
  <div class="child">Centered Content</div>
</div>
</body>

<style>
.parent {
  display: flex;
  justify-content: center; /* 水平居中 */
  align-items: center; /* 垂直居中 */
  height: 200px; /* 仅为示例设置父容器高度 */
}
</style>
(2)grid
<body>
<div class="parent">
  <div class="child">Centered Content</div>
</div>
</body>

<style>
.parent {
  display: grid;
  place-items: center;
  height: 200px; /* 仅为示例设置父容器高度 */
}
</style>
z-index-层级
div{
  z-index: 1;
}
z-index用于定义元素层级,其值为一个整数,正负零(尽量避免用负数),数字大的元素会覆盖在数字小的元素上。你可以把它想象成图层的概念,数字越大,越在上面。
z-index属性只能在设置了position: relative | absolute | fixed的元素和父元素设置了 display: flex属性的子元素中起作用,在其他元素中是不作用的。
opacity-透明度
div {
  opacity: 0.5;
}
opacity用于更改元素的透明度,值的范围在 0-1 之间,opacity 属性会使整个元素均变得透明,使用时慎重
作业
完成上面的页面制作,至少完成到伪类和伪元素部分,完成后将文件打包成压缩包,文件名为自己的名字,提交到下面的表单中
